 ✕
✕
✕
✕
By Justin SabrinaUpdated on September 09, 2025
Question: "Why does the screen go black when a new episode starts on Disney+? How do I screen record Disney Plus on Mac without a black screen?" - From Quora
Disney Plus is a treasure trove of beloved movies and series. It offers a large number of Disney movies and shows from all of the studio's brands, including Pixar, Marvel, Star Wars, National Geographic, and 20th Century Studios. Due to download limits on the Disney Plus app, you may consider screen recording Disney Plus on your devices. However, you will get a black screen when recording Disney Plus. Why this happened? Check out this post, you will find the answer, and get solutions to screen record Disney Plus on PC/Mac/iPhone/Android.
CONTENTS
Just like other streaming services, Disney Plus have added DRM protection on all video content to prevent unauthorized recording, screenshotting, usage and sharing. When you use a tool or inbuilt recording feature to record on Disney+ through browsers (like Chrome, Safari, or Edge), it can detect screen recording and then the screen will go black immediately.
To screen record Disney Plus without a black screen, you need to:
1# Use another browser like Mozilla Firefox to stream Disney Plus content.
2# Turn off the hardware acceleration in your browser.
3# Press on the "Record" button on your tool, and then play video on Disney Plus.
4# If you're a Disney+ ad-free member, you can download Disney+ videos on your iPhone or Android device through its official app.
5# In addition to screen recording, downloading Disney + videos to DRM-free MP4 is another great option.
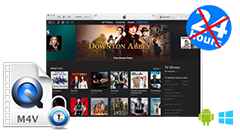
To record and save Disney Plus videos on computer forever, you can turn to this awesome tool - TunesBank Disney+ Downloader. Compared to screen recording, TunesBank can batch download movies and shows from Disney Plus web browser to your computer at fast speed. It will download and export Disney Plus videos to MP4 or MKV files while maintaining HD 720p resolution and 5.1 surround sound. To enhance your viewing experience, it also offers different selection of audio tracks and subtitles language. The downloaded Disney Plus videos will be stored on your local drive permanently, no expiration. What's more, you can move these Disney Plus videos to your phone, tablet, USB drive, SD card and more devices without restrictions.
Features of Disney Plus Video Downloader:
Step 1. Launch TunesBank Disney+ Downloader
Please download and install the TunesBank Disney+ Downloader on your Mac or PC. Then launch the downloader and log in to your Disney Plus account to access the video library.
Step 2. Add Disney+ Movies/TV Shows
You can type the video name or keyword in TunesBank to search videos directly. Or copy & paste the video URL from Disney+ website to TunesBank's search bar.
Step 3. Choose MP4 Format
Click on the "Gear" at the upper right corner. Followed that a settings window will pop up, from where you could customize the video format, video quality, video codec, output folder, audio track language, subtitle language, download speed and more for your Disney Plus downloads.
Step 4. Start to Download Disney Plus Video to Mac
Once you complete the above settings, press on the "Download" icon to start downloading video from Disney Plus to the local folder on your Mac or PC.
Step 5. View Downloaded Disney Plus Videos
After the downloading, tap "History" tab to browse all the downloaded Disney Plus videos. You can click the "Blue Folder" icon next to the video title to locate the output folder.
To screen record Disney Plus videos without black screen, you can use a professional screen recording software. Here we bring the powerful UkeySoft Screen Recorder. It is a simple yet comprehensive video recording & editing software. Different from other recording tools, it allows you to record video/audio from streaming video platforms, music sites, radio stations, gameplay, online meetings. In a word, it can capture all activities on your computer screen without a lag. Therefore, you can use it to screen record Disney movies and TV shows on PC or Mac for offline playback or personal backup.
Step 1. Launch UkeySoft Screen Recorder
After installation, launch UkeySoft Screen Recorder on your Windows PC computer, select "Screen Recorder" first.
Then you will enter its screen recorder interface.
Tips: For Mac users, choose "Full Screen" or "Custom Area".
Step 2. Select the Recording Area
The windows version provides five options to screen record your computer activity. To record videos on Disney Plus, choose "Record Screen" mode.
Then select the recording area.
You can drag the mouse to select the recording area you want to record.
Step 3. Set Audio Source
Next, you need to select the audio input source. To record Disney Plus on PC/Mac, please select "Computer sounds" (Mac users should choose "System Audio").
Step 4. Customize the Output Parameters
Click "Settings" to adjust the output parameters according to your preferences. To record high-quality Disney Plus videos, you can select 'highest' option.
"Hotkey" interface.
Step 5. Start Recording Disney Plus Video on PC
Now open the Disney Plus movie or show in a web browser. Then hit on "Record" button.
Step 6. Stop and Save Disney Plus Video
Once you've recorded the desired content, click on the "Stop" button.
To view the output Disney Plus video files, please click "Video list.
How can you screen record Disney Plus for free? Well, OBS Studio is a powerful and versatile choice for Mac and Windows users. OBS Studio enables you to capture your screen, camera and microphone for free. But compared to a professional screen recorder, OBS Studio makes it complicated to record on streaming videos platforms like Disney Plus. You can follow the steps below to have a try.
Step 1. Open a browser, and disable the hardware acceleration. Then go to Disney Plus official website, and sign in with your account.
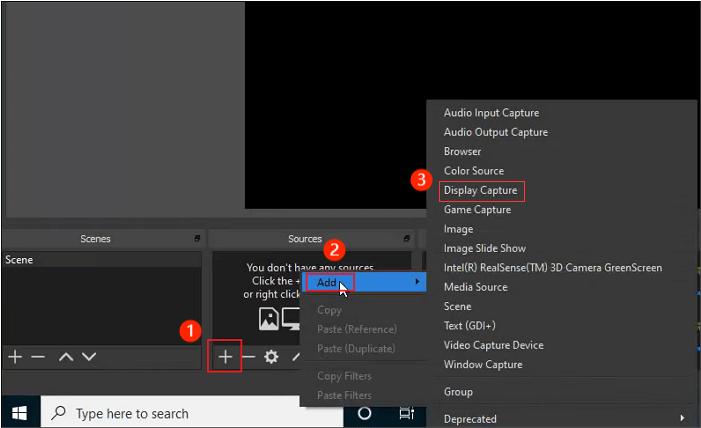
Step 2. After installation, open OBS, tap the "+" button at the bottom of the screen. You need to add the video source, select "Add" > "Display Capture".
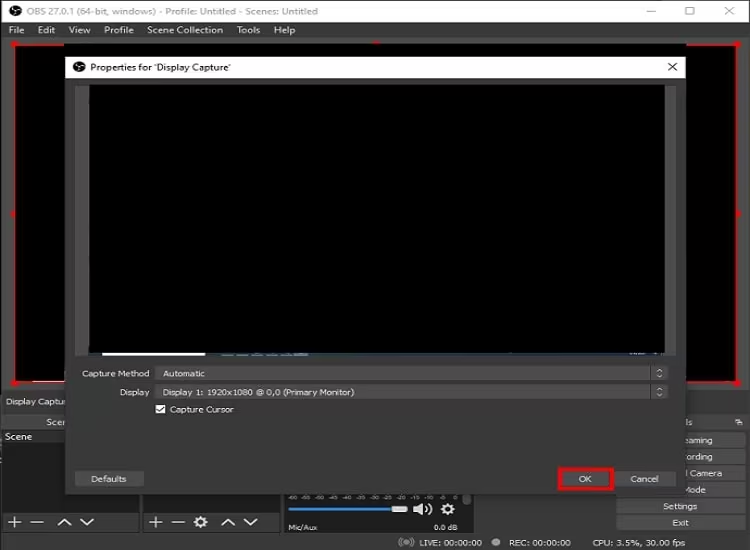
Step 2. In the "Properties" window, name it and select the "Capture Method" and set "Display" as your primary monitor. You can select the Disney Plus playback window as the source. Then click "OK" button.
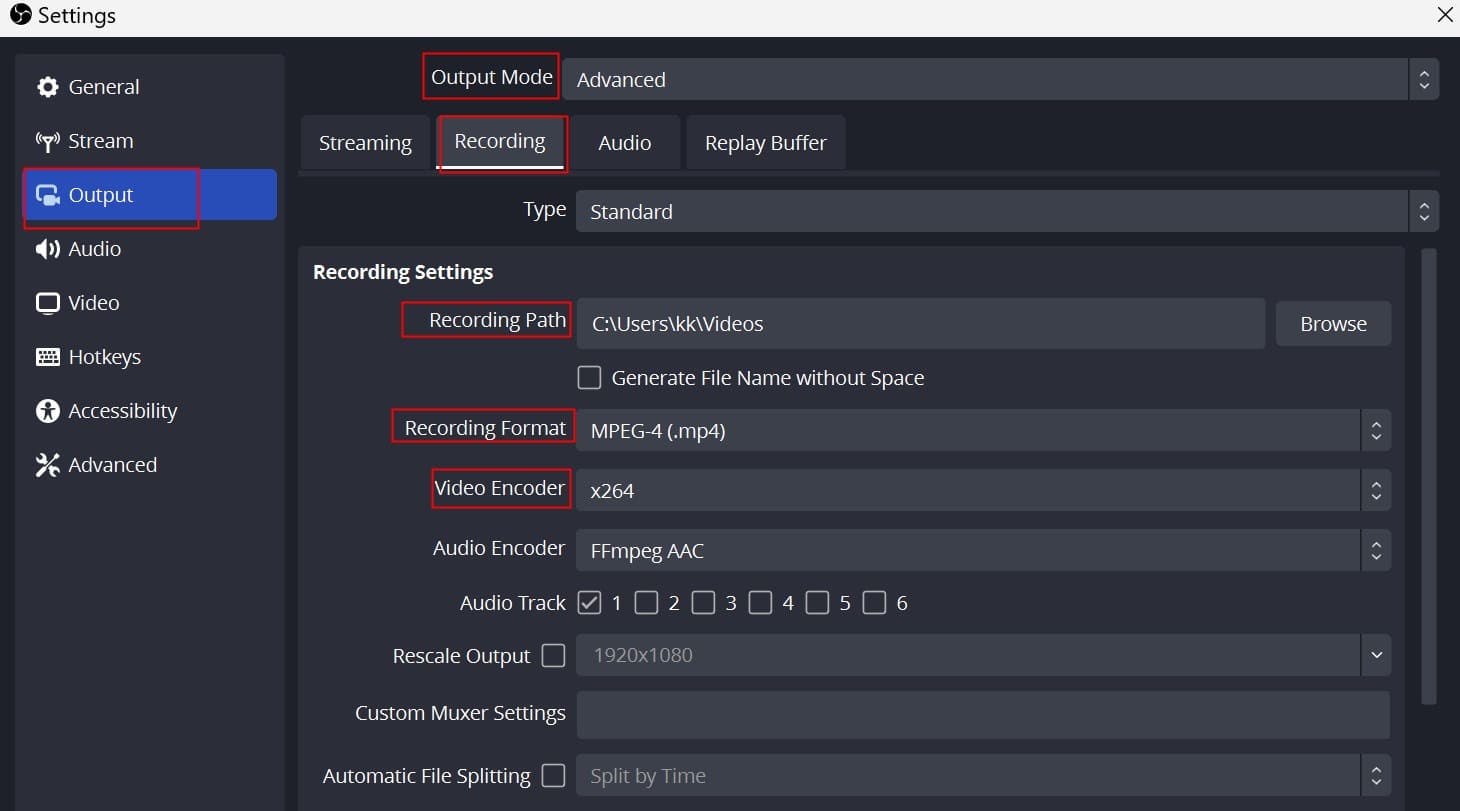
Step 3. Before recording, You can go to "File" at the menu and select "Settings" to pop up the settings window.
Step 4. Select "Output" and tap "Recording" tab, from where you can customize the Recording Path, Recording Format, Video Encoder freely.
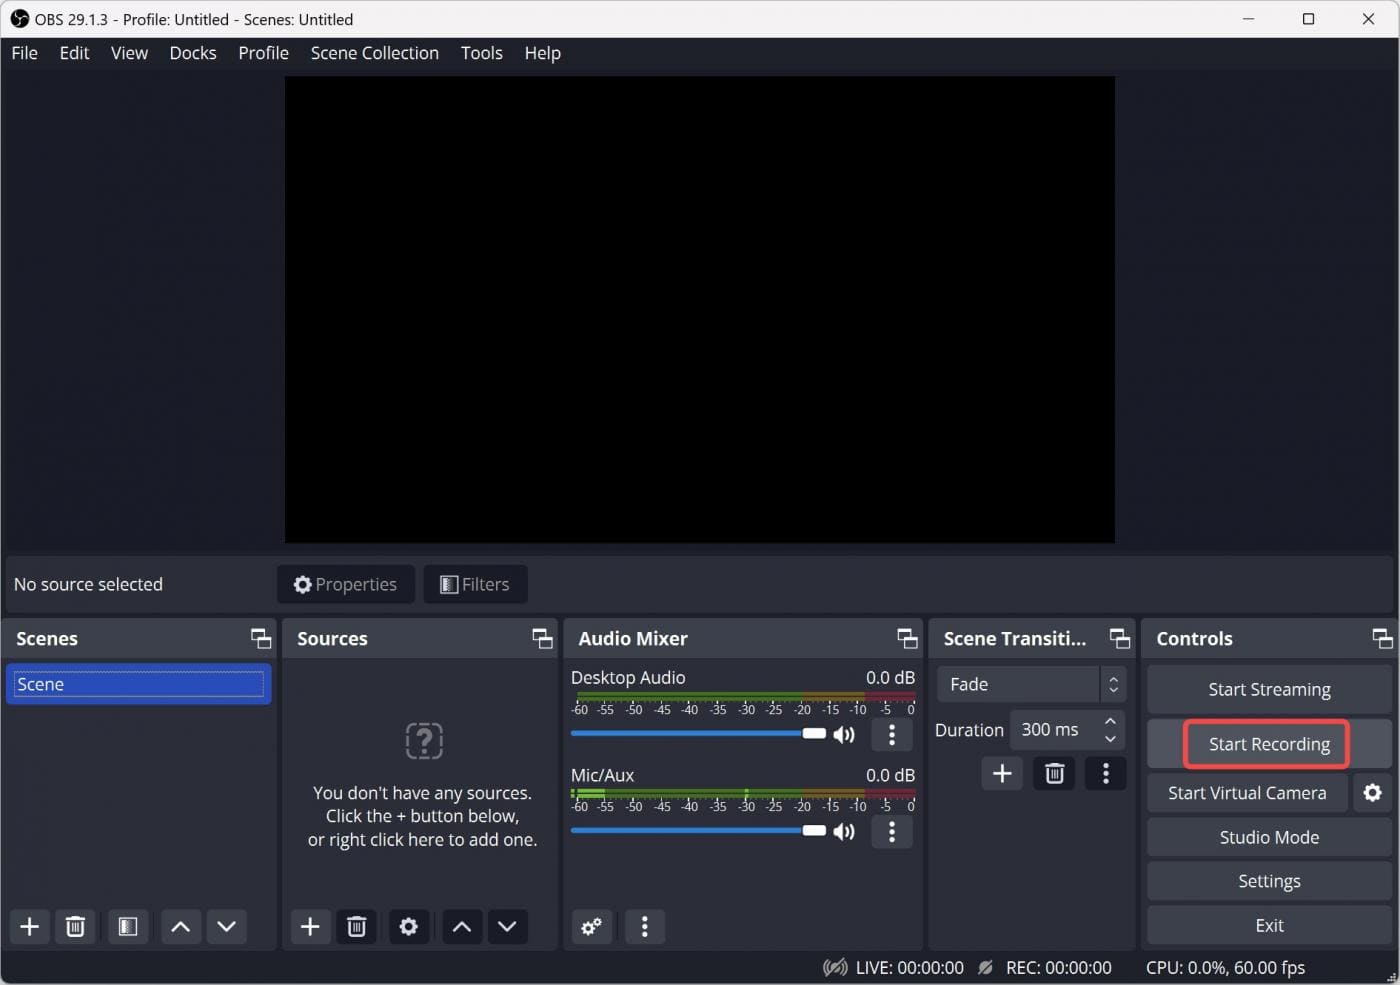
Step 5. Now you can play a Disney Plus movies or show, then click on the "Start Recording" button to screen record Disney Plus on PC or Mac.
Here we will introduce two methods on how to download or record Disney Plus on your phone, one is use the official download feature on app, another is use the built-in recording feature.
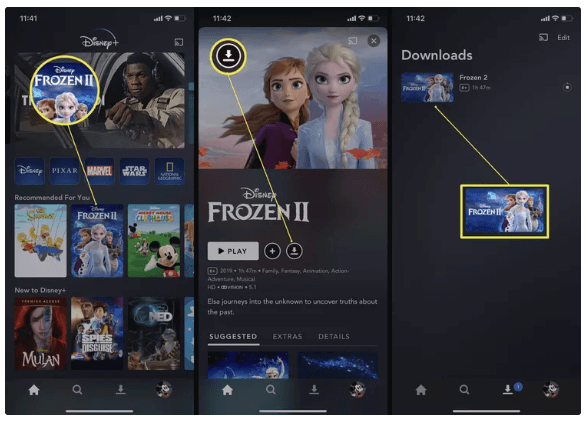
If you have a Disney+ Premium or Bundle plan (no Ads), you can directly download Disney+ videos to watch offline on your iPhone or Android. Go head, follow the steps to download and save Disney+ video on your iPhone or Android device.
Step 1. Launch the Disney+ app on your iPhone or Android, sign in with your ad-free account.
Step 3. Search for the movie or episode you want to download, and play it.
Step 4. Tap the "Download" button to start downloading.
Step 5. When the download is complete, you can tap "Download" icon at the bottom of the screen to view your downloads.
But the downloaded Disney+ videos only last for 30 days. Once you start watching, it will expire 48 hours. Moreover, you can only enjoy them within the Disney+ app. And you will lose access to them after your subscription is canceled or expires.
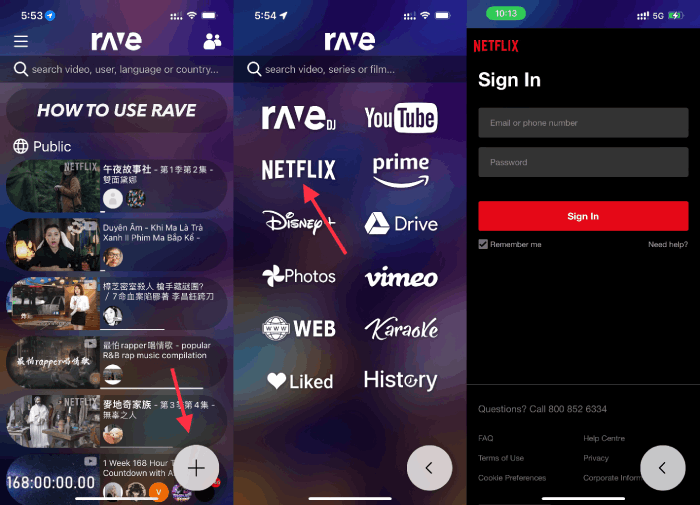
As we mentioned above, Disney Plus can detect screen recording. If you're streaming Disney+ on the mobile app, the window will instantly go black when using the built-in recording feature on your phone. Therefore, you need to stream Disney Plus content using a third-party app such as Rave. Rave is a free ad-based app that allows to stream movies and TV shows from popular sites, like Disney Plus, Netflix, Amazon Prime Video, HBO Max,etc.
Step 1. Install and open the Rave app on your iPhone or Android.
Step 2. Click "+" icon and select Disney Plus, then sign in with your account.
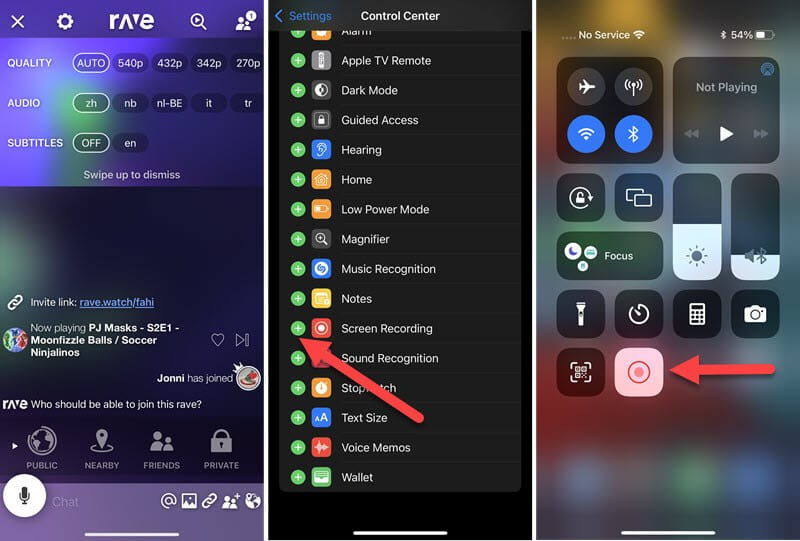
Step 3. Find any movie or show you want to record, and adjust its video quality, audio, subtitle at will.
Step 4. Add the Screen Recording to Control Center on your phone in advance.
Step 5. Play a Disney Plus video on Rave, and open the "Record" button on your phone.
Screen recording Disney Plus videos locally is a hot demand. The official download feature is only available on Disney Plus app for mobile devices. To record and save Disney Plus videos on computer, using a third-party screen recording software is helpful. There are many ways to record Disney Plus on all types of devices, including Window PC, Mac, iPhone or Android devices. We've shared different methods in this post. While screen recording will take a long time to finish your recording, directly downloading Disney Plus movies and shows through TunesBank Disney+ Video Downloader can help you save time and get better video quality. Go and download it right now!

Sorry the comment has been closed.
Porducts
Solution
Copyright © 2026 UkeySoft Software Inc. All rights reserved.


Comments are off!