 ✕
✕
✕
✕
By Justin SabrinaUpdated on January 18, 2024
There are many times you need to save what's on your screen. Maybe something interesting you want to share with friends or family, have an idea of capturing a classic scene on video, screenshot your gaming achievements, or just need to save any tutorial or guide tips for easy reference later. Thankfully, whether you're running older or new macOS, there are a few easy ways to take screenshots of all -- or part -- a specific window of your screen. Here's how to use keyboard shortcuts, the built-in tools and third-party screen recorder to take a screenshot on your Mac.
CONTENTS
The Basics: Keyboard Shortcuts
Taking a screenshot on a Mac is as simple as pressing a few keys. Let's check the screenshot shortcuts on a Mac.
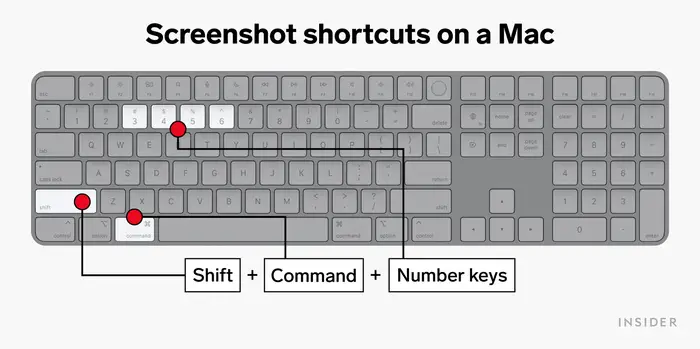
Shortcut 1. Take a Screenshot of Your Entire Screen on Mac
To capture your entire screen, please follow this simple steps:
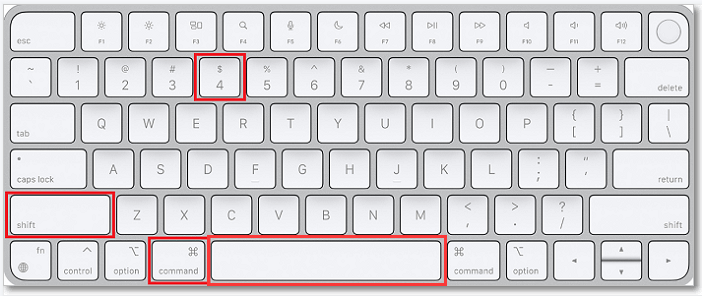
Step 1. Press Command (⌘) + Shift + 3 simultaneously.
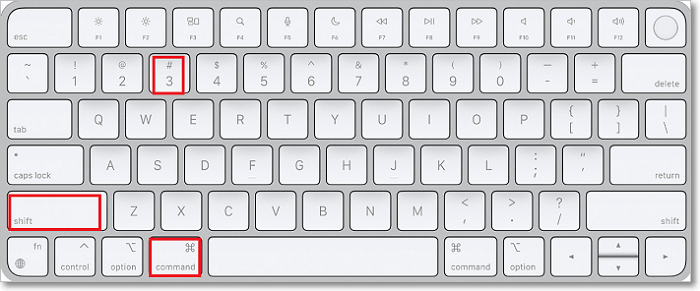
Step 2. Then you will hear a camera shutter sound, and the screenshot will be saved as a PNG file file to your desktop.
Shortcut 2. Take a Partial Screenshot
If you want to capture a specific area on your screen, this shortcut allows you to select and capture only what you need.
Step 1. Press Command (⌘) + Shift + 4.
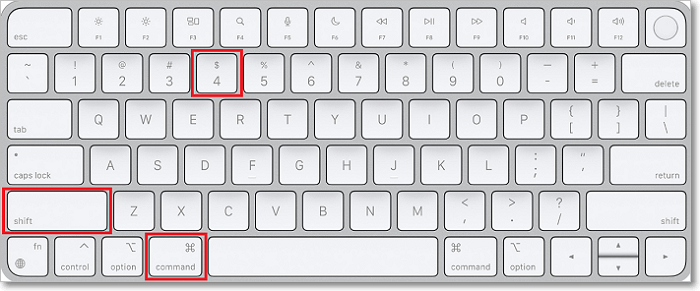
Step 2. Your mouse cursor will turn into a crosshair. Click and drag to select the area you want to capture.
Step 3. Release the mouse button to take the screenshot.
Shortcut 3. Capture a Specific Window
You can also capture a screenshot of an active Window, here's how:
Step 1. Open an app Window or website that you capture.
Step 2. Press Command (⌘) + Shift + 4, then hit the Spacebar.
Step 3. The mouse cursor will turn into a camera icon. Click on the Minecraft window to capture it.

Shortcut 4. Capture a Menu
If you want to capture a menu on your screen, this combination allows you to do so.
Step 1. Press Command (⌘) + Shift + 4.
Step 2. Then press the Spacebar. The cursor will turn into a camera icon.
Step 3. Hold down the Option (⌥) key and click on the menu you want to capture.
In this part, we will share a comprehensive solution for taking screenshots on any Mac computer. UkeySoft Screen Recorder is the most awesome screenshot tool for Mac and Windows computer. It allows users to capture a specific window, an entire screen, or just part of your screen with high resolution footage. You can also edit your screenshots by adding arrows, text, numbers, frames and more to highlight it.
Apart from this, UkeySoft Screen Recorder is also a one-stop screen recorder, video editor, as well as video converter. You can use it to screen record all activities on your computer, including full screen, app window, webcam, videos, streaming music, online meetings, gameplays, live streams, etcc.
Step 1. Launch UkeySoft Screen Recorder
First, download and install the UkeySoft Screen Recorder on your Mac computer.
Launch the program and choose "Custom Area" option.
Step 2. Customize the Screenshot Area
Customize the size of the area you want to capture. Or set it to take a screenshot of your entire screen on Mac
Step 3. Check Screenshot Shortcut Key
Click on the "Gear" icon to open the settings window. Tap "Shortcuts". You can see the Shortcut of Screenshot is: Command (⌘) + 4.
Step 4. Start Taking a Screenshot on Mac
Now you can press Command (⌘) + 4 to make screenshots on your Mac!
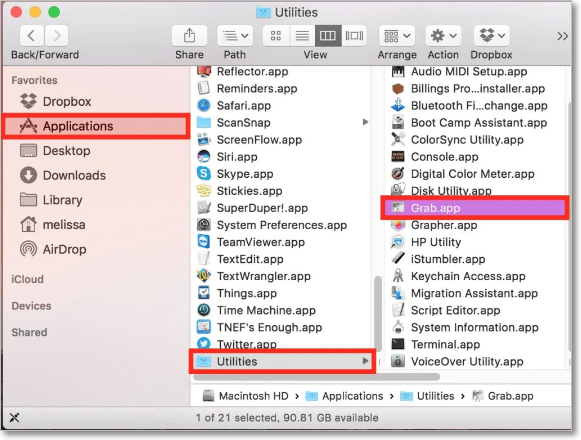
Grab is a built-in screenshot utility on macOS until High Sierra (version 10.13). It allows users to capture a selection, a specific window, or timed Screen on macOS.
Preparation: Launch Grab App
Open Finder, select "Applications" > "Utilities" > "Grab.app".
1). Capture a Selection:
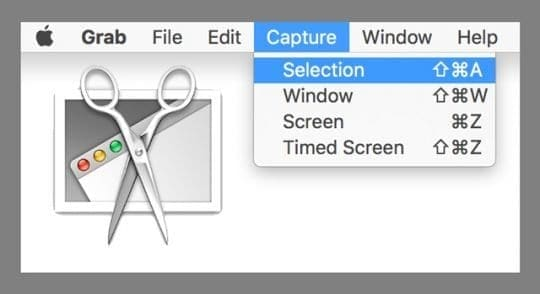
Step 1. Click "Capture" from the menu, select "Selection" option.
Step 2. Click and drag to select the area you want to capture.
Step 3. Then release to save the screenshot.
2). Capture a Window:
Alternatively, you can take a screenshot of a specific window using Grab.
Step 1. Go to "Capture" and choose "Window".
Step 2. Select the window you wish to capture.
Step 3. Then click the "Choose Window" button, you can open and prepare the app window.
Step 4. Go back to Grab, and click "Choose Window" button.
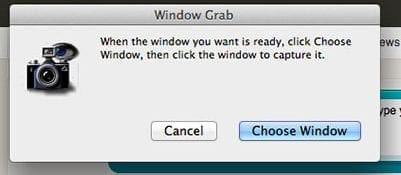
Step 5. Click on the window you want to capture. Then save the screenshot.
3). Capture the Entire Screen:
Step 1. In Grab, select "Capture" > "Screen".
Step 2. It will pop up a window asking you to click anywhere outside the instructions window.
Step 3. The Grab will take a screenshot on the entire screen, including the mouse cursor.
4). Capture a Timed Screen:
Grab also allows you to capture a timed screen to set up elements or navigate to a specific menu.
Step 1. Click "Capture" and choose "Timed Screen."
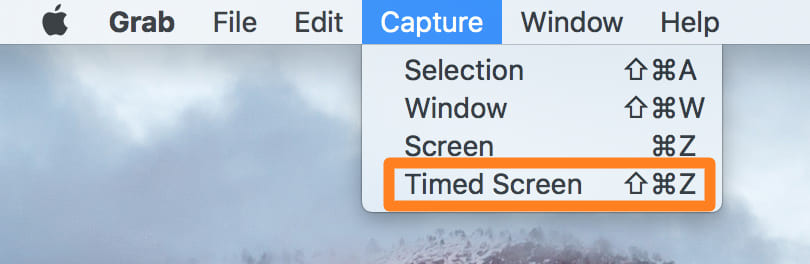
Step 2. Set a timer, click "Start Timer," and navigate to the desired screen.
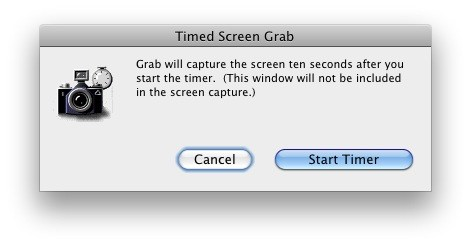
Step 3. The screenshot will be taken after the timer expires.
The Touch Bar is a feature that was introduced by Apple in 2016 on its certain MacBook Pro models. It assists you to adjust common system settings, use Siri, access function keys, and do tasks in apps, saving your time. If your Mac has a Touch Bar, you can use it to take a screenshot.
Step 1. First, open "System Preferences" from the Apple menu bar, and choose "Keyboard".
Step 2. Click "Customize Control Strip" in the lower right corner of the Keyboard tab.
Step 3. Drag and drag the "Screenshot" button to the Touch Bar area, and click "Done".
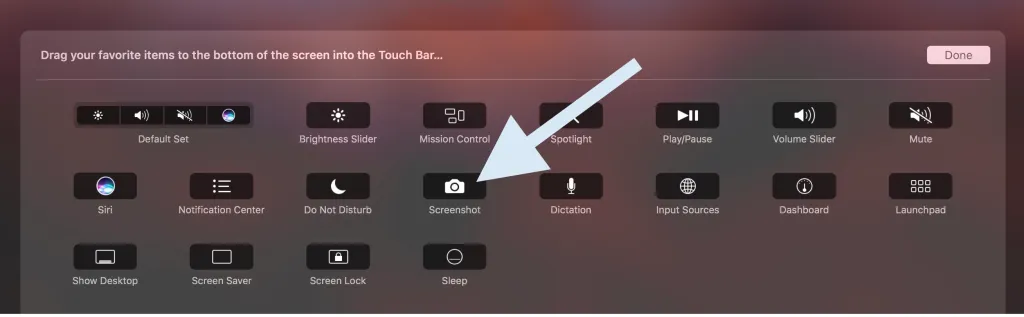
Step 4. Now press Command (⌘) + Shift + 6 on the keyboard.

Alternatively, you can click the "Screenshot" button in the Touch Bar.
Step 5. It will then instantly capture everything on the Touch Bar.
Step 6. Click "Save To" and select what you want to do with the screenshot after you take it.

Screenshot.app has replaced the Grab app on macOS Mojave and later. This means you can use it to take a screenshot on macOS Mojave, macOS Catalina, macOS Big Sur, or macOS Monterey.
Step 1. On your Mac, press Command + Shift + 5 on the keyboard (or use Launchpad) to open the Screenshot menu and display the tools.
Step 2. The screenshot menu will appear at the bottom of the screen.
Step 3. You can choose a tool from the three icons (including entire screen, a specific window, or a highlighted section.)
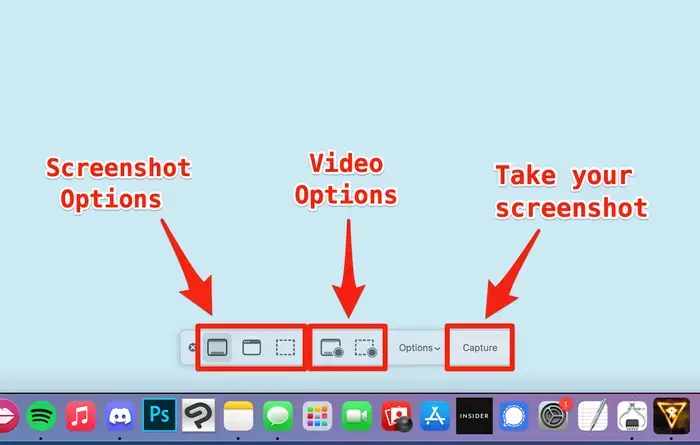
The next two icons on the right allow you to record video of the entire screen or just the highlighted portion.
Step 4. Select what you want to capture or record, then click the "Capture" button to take your screenshot.
Tips: The screenshots will be saved to your desktop by default. If you want to change the default screenshot location, you can select "Options" button. You may also edit your screenshot options there.

Preview app is a built-in program in macOS that supports a wide range of file formats, including JPEG, PNG, PSD, and TIFF. It not allows users to view, print, and edit digital images and PDF files,but also lets you make screenshots for free.
Step 1. Open the window or screen, or play any video that you need to capture.
Step 2. Start the Preview app on your Mac, go to "File" > "Take Screenshot".
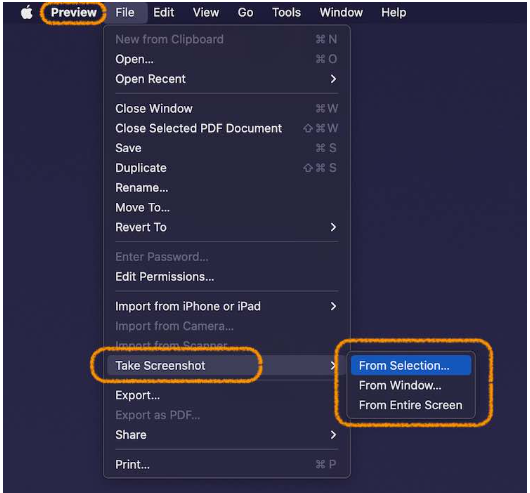
Step 3. You can choose to capture a screen shot from a selection, a window or the entire screen.
Where to Find Your Saved Screenshots on a Mac?
By default, screenshots are saved to your desktop.
If you can't find anything on the Desktop, you can visit: Finder>Go>Home>Pictures>Screenshots.
For macOS Catalina users, please check this file path: Finder>Go>Home>Library>Pictures>Screenshots.
How to Change the Default Screenshot Location?
Step 1. Open Finder, select "Applications", under the "Utilities" folder, select "Terminal".
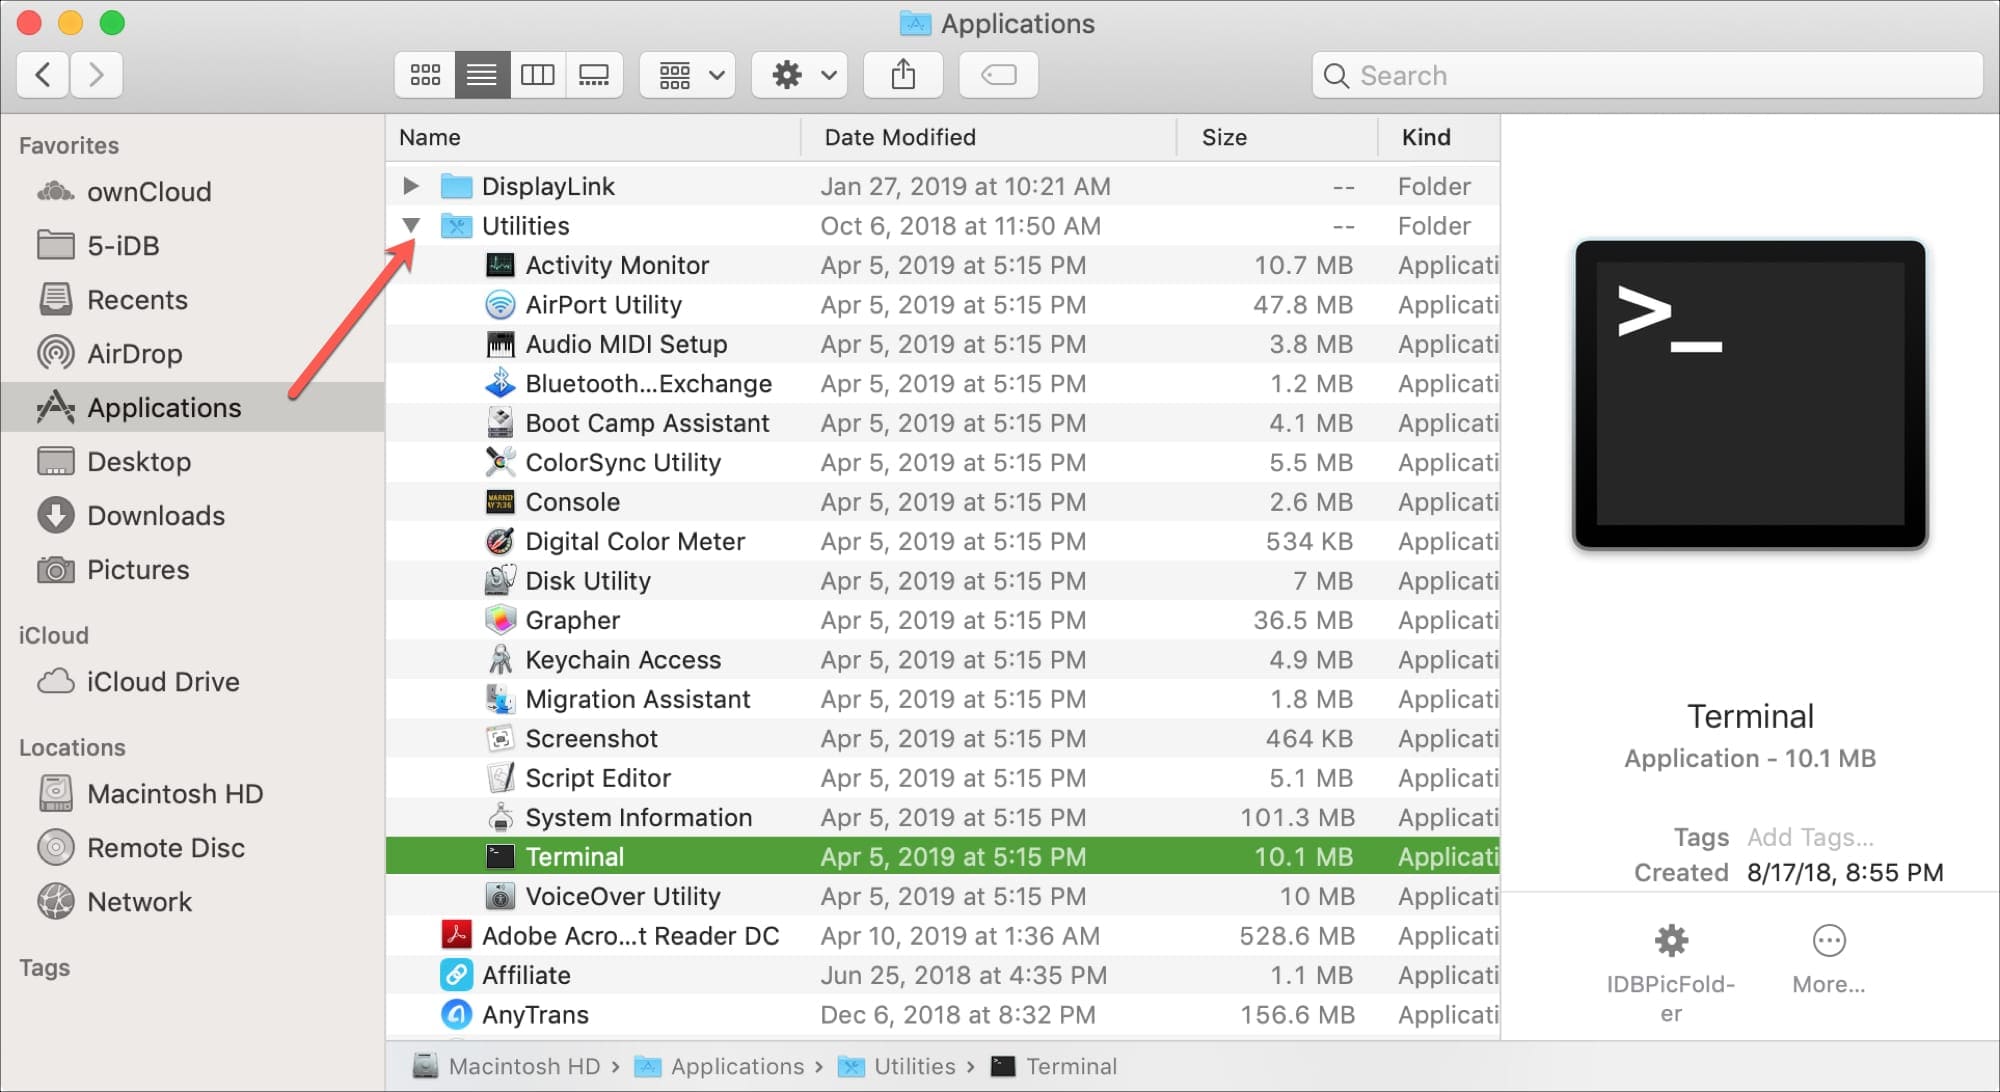
Step 2. Type the following command and press Enter: defaults write com.apple.screencapture location /path/.
Step 3. Replace /path/ with the desired location (e.g., /Users/YourUsername/Pictures/Screenshots).
Step 4. Drag the folder you created into Terminal, and it will automatically add the path information to the end of the command.
Step 5. Press Enter on your keyboard. Now, screenshots will save to this folder instead of your desktop.
Step 6. Restart your Mac for changes to take effect.
Mastering the ability to take screenshots is an essential skill for Mac users. Above, we've introduced different methods to teach you how to take a screenshot of your screen/window/application on a Mac. You can quickly capture screenshots through the keyboard shortcuts, the utility of built-in tools, or the enhanced capabilities of third-party screenshot tool like UkeySoft Screen Recorder. If you prefer to take and edit screenshots it further, UkeySoft Screen Recorder is your best choice. It also helps you capture video/screen/music/audio/webcam/microphone and more on your computer with no lag!

Sorry the comment has been closed.

Enjoy safe & freely digital life.
Utility
Multimedia
Copyright © 2025 UkeySoft Software Inc. All rights reserved.


Comments are off!